

26-Step Website Migration SEO Checklist

Website migrations are already difficult and complex, especially when you consider SEO rankings and preserving organic traffic from search engines like Google.
If you’re an SEO who wants to learn how to do website migrations without losing traffic or a business owner who wants to get an overview of what is required from an SEO perspective in terms of resources (time, cost, team) so that you can effectively allocate the right budget, then you are in the right place.
This blog post provides you with a step-by-step checklist on SEO migrations from the pre-migration to the post-migration steps so that you can do a website migration without losing SEO rankings and organic traffic.
Below is a breakdown of the main sections of this blog post.
- What is the Definition of a Website Migration?
- Does a Website Migration Affect SEO?
- What is an SEO Migration?
- SEO Website Migration Checklist
- Pre-Migration SEO Checklist: Current Site
- Create an SEO Migration Plan
- Perform an SEO Technical Audit: Crawl the Current Site
- Record All Pages and Identify Pages with High Traffic, High-Value Backlinks, and High Conversion Rates
- Record All Images and Identify Top-Traffic Ones
- Benchmark Current SEO Performance
- Download the Robots.txt File
- Download the Sitemap
- Create a Backup of the Current Website
- Pre-Migration SEO Checklist: New Site
- Pre-Migration SEO Checklist: URL Mapping
- SEO Migration Checklist
- Post-Live SEO Migration Checklist
- Post-launch Website Crawl and Fix Any Important issues
- Test All the 301 Redirections
- Ensure the new XML Sitemap is Correct and Submit it to Google Search Console and
- Verify the Robots.txt file is Correct
- Submit Domain Name Change in Google Search Console (if necessary)
- Add the New Website to Rank Tracking and Analytics Tools
- Update the tracking of events and conversions
- Implement Tracking Codes and Make an Annotation
- Monitor the New Website’s Rankings, Traffic, and Conversions
- Pre-Migration SEO Checklist: Current Site
- Conclusion
What is the Definition of a Website Migration?
Website migration is the process of making major site-wide changes to a website’s technology, structure, design, or location with the purpose of improving the site’s user experience and SEO performance.
Website migrations can be a very difficult process requiring a lot of resources and time therefore, you must have a good reason in conjunction with the expertise, budget, and time to undergo one.
As an e-commerce and digital marketing agency, we constantly get enquiries from clients about our website migration services and have found the most common reasons why businesses want to migrate their website, which are below.
- Changing to a new website platform or framework: e.g., moving your site from WooCommerce to Magento to enhance the site performance (speed and efficiency), have access to advanced features, and/or improve security and user experience.
- Changing website architecture: e.g., creating a more organised and logical website structure to improve the user experience and SEO performance.
- Switching from HTTP to HTTPS: this ensures the website visitors’ information is encrypted, which helps secure the website.
- Relocating to a new server: changing to a new host to help speed up the website thus improving core web vitals, which benefits SEO and user experience.
- Changing the domain name: this is usually done as part of a rebrand, which requires the movement of old content to the new website.
What are the Different Types of Website Migrations?
The 10 different types of website migrations are: domain migrations, website redesign migrations, platform migrations, site structure migrations, content migrations, subdomain to subdirectory migrations, international migrations, HTTP to HTTPs migrations, mobile setup changes, and hybrid migrations.
Below we explain what each type of site migration is and the intended goal of each migration.
- Domain migration: Moving a website from one domain to another. For example, changing your domain from olddomain.com to newdomain.com. A domain migration can be done for several reasons, including rebranding, mergers and acquisitions, SEO improvements, or even legal reasons.
- Website Redesign Migration: This is the complete renovation of the website design, which can involve updating a website’s look, feel, structure, and functionality for rebranding, user experience, or SEO purposes.
- Platform Migration (Replatforming): The changing of the platform or CMS (Content Management System) your website is built on such as switching from Ghost to WordPress. This is done to improve performance, scalability, security, or even user experience.
- Site Structure Migration: This is the changing of the website architecture or structure, which can include altering the URL patterns, navigation, site hierarchy, and/or site internal linking. For e-commerce sites, this can make it easier for users to find products but also for search engines to more efficiently crawl pages. Check out our blog post about ecommerce site structure for more information.
- Content Migration: This type of site migration is the process of moving content such as text, images, and videos from one website to another.
- Subdomain to Subdirectory Migration: This involves the movement of content to a subdirectory (e.g., example.com/blog) from a subdomain (e.g., blog.example.com). This type of migration is usually done as it’s believed that content in a subdirectory can improve SEO results.
- International Migration: This site migration involves website changes such as switching from a generic top-level domain (gTLD) to a country-code top-level domain (ccTLD) or implementing hreflang tags to accommodate to different languages or regions. The purpose here is to expand market reach and better connect with local customers thus driving growth and engagement worldwide.
- HTTP to HTTPS Migration: This type of site migration is also known as a protocol change, which involves the movement of your website from HTTP to HTTPS to improve security, which has SEO benefits as Google recognises HTTPS as a ranking signal.
- Mobile Setup Changes (Partial Migration): The purpose of mobile setup changes is to enhance a website’s usability and performance on mobile devices. This includes implementing responsive design, optimising load times, and improving navigation for touch interfaces in an attempt to provide seamless and efficient user experience for mobile users.
- Hybrid Migrations: This is a combination of the different types of site migrations. For example, you may want to change the domain, structure, and content of your website, which would require multiple different types of site migrations.
Now that you understand each of the different website migrations available to you, you must now choose what type of site migration you require as each of them have unique needs, issues to address, and common pitfalls to watch out for.
Does a Website Migration Affect SEO?
A website migration affects your website’s SEO and organic traffic, both for better or worse. A well-managed site migration positively impacts your SEO rankings in the SERP thus increasing organic traffic.
Whereas a poorly managed migration can negatively impact SEO leading to a loss in visibility and organic traffic. Therefore, it’s important to follow best practices to ensure you successfully do a website migration without losing traffic and SEO.
What is an SEO Migration?
An SEO migration systematically transfers search engine ranking signals, authority, and indexing cues to accurately reflect substantial changes in your website’s URL structure or architecture, ensuring seamless continuity of visibility, rankings, and organic traffic in search engine results during a website migration.

SEO Website Migration Checklist
We can now provide you with a step-by-step checklist that we’ve developed over the past few years of undergoing website migrations for many businesses, so you can undergo your website migration with ease ensuring you maintain, if not improve, your SEO rankings and traffic after the migration.
Below we have broken down this SEO website migration checklist into important phases of the process, including pre-migration, migration, and post-migration to make it easier to follow.
Pre-Migration SEO Checklist: Current Site
Below we have provided you with all the pre-migration SEO steps required on your current live website before the site migration to ensure success.
1. Create an SEO Migration Plan
To create an SEO migration plan you need to perform the tasks below.
- Set goals. Having a clear, measurable outcome associated with your SEO migration will help you stay focused throughout the migration process. Additionally, it will aid you in assessing the success of the migration once it’s completed. You should ask yourself whether the purpose of your SEO migration is to preserve existing search engine rankings and organic traffic, improve site structure, and/or enhance user experience.
- Familiarise yourself with the entire website migration process. This ensures that you have an idea of what is required of you and your team before embarking on the journey, which will reduce the chances of any unexpected events or mistakes.
- Assemble the correct team. Having the right specialists that can effectively carry out all the tasks involved in the project, such as developers, technical SEO experts, and a project manager, will ensure a smooth SEO migration process.
- Pick the best time to execute the SEO migration. The best time to schedule an SEO migration is when your website traffic is at its lowest, which could be during weekends or off-peak hours. This ensures you don’t negatively impact the user experience and thus any potential conversions that could occur.
- Create a realistic timeline. This is crucial as it ensures adequate resources (time, budget, personnel) are allocated, minimises website downtime, and allows for thorough testing of redirects, links, and overall site functionality. A realistic timeline will vary depending on the size and complexity of the website, the extent of the changes, and the resources available, which can take a few months to a year in some cases.
2. Perform an SEO Technical Audit: Crawl the Current Site
The next step on the checklist is to crawl your website, which allows you to obtain a complete list of the URLs on your current website so that you have them in the future when it’s time to setup redirects, maintain site architecture, and ensure no pages have been lost during the migration.
There are many tools out there that you can use to crawl your site such as SEMrush Site Audit, Sitebulb, Ahrefs Site Audit, and SE Ranking Website Audit. We recommend using Screaming Frog.
Note: Simply crawling your website using any of these tools may not provide you with all the URLs on your current site so it’s best to look deeper in the CMS of your current site or in Google Search Console property data – to speed up the process you can even use Google Search Console API on Screaming Frog to get more URLs.
When you crawl your website take the opportunity to also perform a technical SEO audit, which is a crucial diagnostic step in the technical infrastructure of your website that identifies and fixes any existing issues that could negatively impact the new site’s performance such as crawlability, indexation, site speed, and mobile friendliness.
This preparation prevents the transfer of problems to the new site, which provides a clean and strong foundation for the migration.

3. Record All Pages and Identify Pages with High Traffic, High-Value Backlinks, and High Conversion Rates
Now that you have a list of all the URLs on your website, you must prioritise the pages based on the number and quality of backlinks, the amount of traffic (from organic, social, direct, paid, and referral), and the number of conversions for each page.
This is a crucial step as it ensures that pages driving a large proportion of domain authority, search engine rankings, traffic, and revenue are prioritised, successfully migrated, and not lost during the migration process.
To quickly obtain the traffic performance of all the pages on your website, you can simply use Screaming Frog together with Google Search Console and Google Analytics 4 API – ensure that you set the crawl configuration on Screaming Frog to extract data (clicks, impressions, position, users, sessions, etc.) over the last 12 months.
To identify the pages with backlinks, we recommend using SEMrush and the “top linked pages” section of Google Search Console. From here you can check the number and quality of backlinks and referring domains each page has.
Alternatively, you can go to Screaming Frog and use Ahrefs API access to get this information.
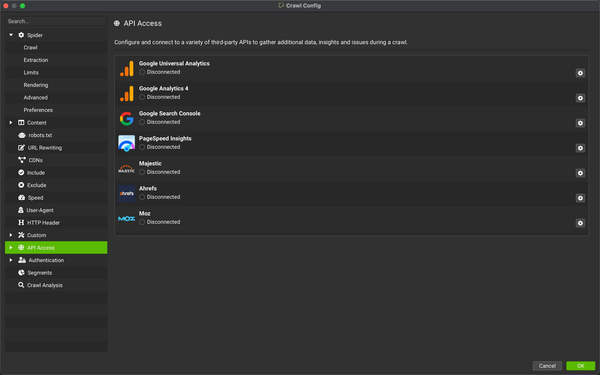
Below is a screenshot of Screaming Frog’s crawl configuration for API access so you know exactly what you should be looking for when you go to Screaming Frog.
4. Record All Images and Identify Top-Traffic Ones
I have seen time and time again how images are simply ignored during migrations and how it can negatively affect the SEO performance of a website. Even John Mueller, the senior webmaster Trends Analyst and Search relations team lead at Google advises to redirect images.
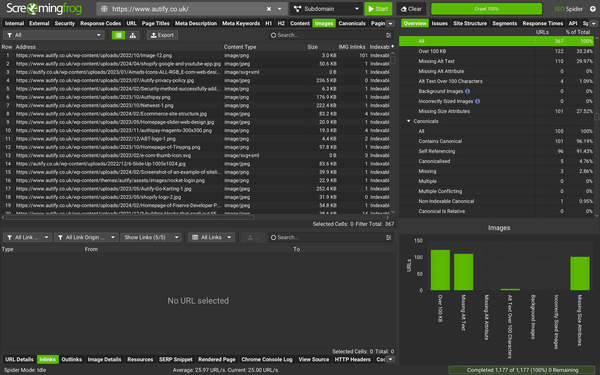
Therefore, it’s important that you also get a list of all the image URLs on your website with the organic search traffic and rankings over a long enough period (at least the last 6 months but I would recommend the last 12 months) as well as the backlink profile of each image URL. This can be done using Screaming Frog in the same way we mentioned above where you use the API access functionality.
You can also go to the performance report of Google Search Console and apply the Image filter, which will give you an understanding of the images that are bringing in the most organic search traffic. This is shown below.
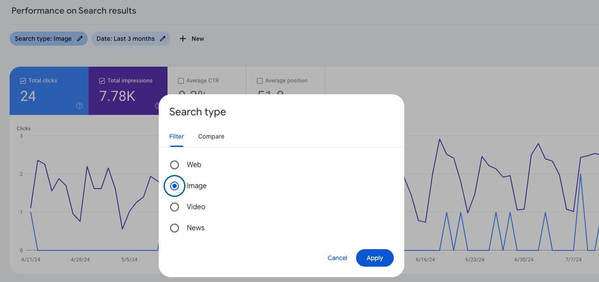
This ensures you can prioritise the migration of images with the highest ranking, organic traffic, and quality backlinks while the images that you decide not to migrate can simply be 301 redirected to the appropriate URL to make certain that your SEO efforts aren’t negatively impacted.
5. Benchmark Current SEO Performance
You must also make a note of your current SEO performance. Why? Because it allows you to compare the SEO performance post-migration to what it was pre-migration, which will give you insight into whether the migration was a success from an SEO standpoint and whether there are any improvements that can be made.
Current SEO performance includes crucial metrics such as organic search traffic (clicks and users), query count, query rankings, Google Discover traffic, conversion rates, Google crawl stats, core web vitals, and indexation rate.
The best way to go about this is to simply download all this information from Google Search Console and Google Analytics 4, then keep the data in an excel spreadsheet with two tabs, the first one being “Pre-migration” and the second one being “Post-migration”. This will allow you to compare the data across the two periods.
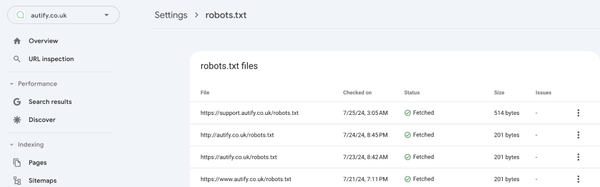
6. Download the Robots.txt File
It’s important that you download a copy of your current robots.txt file because you ensure that the directives that control how search engines crawl and index your site are preserved and correctly implemented on the new site to maintain consistency in how search engines interact with your content.
Downloading the robots.txt file also helps identify which parts of your site are currently blocked from being crawled, ensuring that important sections are not inadvertently blocked post-migration, thus negatively impacting SEO.
Access your robots.txt file by navigating to “yourwebsite.com/robots.txt” and downloading the content (you can simply copy and paste the content into a word document). Below is an example of what a robots.txt file looks like.

Once you have downloaded the robots.txt file you can analyse the directives to understand which parts of your site are allowed or disallowed for search engine crawlers. Make any necessary adjustments to the directives based on the structure and needs of the new site.
7. Download the Sitemap
You must also download the XML sitemap on your current site so that you don’t miss any crucial pages during the migration thus preserving the site structure. It will also allow you to compare the new sitemap with the old one to ensure all necessary pages have been transferred correctly.
Access your current XML sitemap, which is usually found at “yourwebsite.com/sitemap.xml” and download it. From there you can also analyse the sitemap to understand the current site structure and ensure all important pages are included.
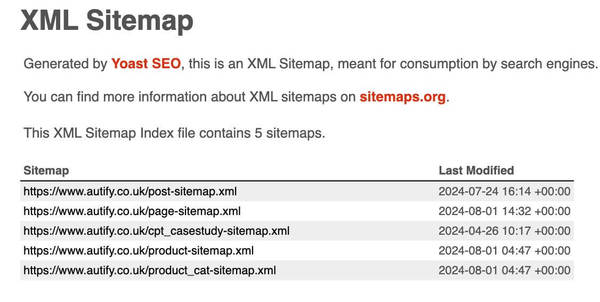
Note: Larger websites can have multiple smaller sitemaps so make sure you download them all as well.
8. Create a Backup of the Current Website
If you haven’t already done so, please create a backup of your current website so that if the launch of your new site doesn’t go as expected, you can simply revert to your old site if necessary.
You will need to speak with your web developers to sort this out and create a rollback plan if you need to go back to the old website.
Pre-Migration SEO Checklist: New Site
Now that you have done all the pre-migration SEO steps on your current website (will eventually become the old site), you can move onto the next phase of the pre-migration SEO steps, which are the actions you must perform on your new website.
The new website is usually a copy of your proposed new site to act as the safe testing environment (staging or development environment) where you can apply changes and upgrades without affecting your live site.
Your developers should be able to help you out with this process.
Below we have provided you with all the pre-migration SEO steps required on your new website before the site migration to ensure success.
9. Block the New Website from being Crawled and Indexed
First and foremost, you must block search engines from accessing your new website in the staging environment as you don’t want both search engines and users to find the site before it’s ready.
You can use the robots.txt file to prevent search engine bots from crawling and indexing your new site. However, there is a slight chance that the blocked URLs still appear on the search results.
We recommend password protecting your site with a HTTP authentication step to keep both search engine crawlers and users from accessing the site then adding a noindex tag to every page on your staging site to tell crawlers not to serve your web pages on the SERPs.
Below is what a noindex tag looks like.
<meta name=”robots” content=”noindex”>
10. Crawl the New Site in the Test Environment
A complete crawl and audit of your new website in the staging environment is imperative to help you identify any potential problems such as broken links, 404 pages, missing canonical tags, duplicate H1’s, orphan pages, etc, so that the site is free of issues before going live.
Once you understand the issues affecting your site you can proceed to fix them.
Screaming Frog can be used to crawl and audit your site. If your staging website is password protected then you must navigate to “configuration”, “authentication” then select “forms based”. From here you click “add” then enter the website URL and enter the password and username, which will let you crawl the website.

If you have blocked your staging website using the robots.txt file, then you simply need to configure Screaming Frog to ignore the robots.txt file.
Alternatively, you can use SEMrush’s Site Audit tool and configure it to crawl your website in the test environment.
Once you have fixed these issues you can then re-crawl your website to ensure that they have been fixed correctly.
Ensure you save your crawl for later and have a complete list of URLs on your new site as you will need this information later for mapping and 301 redirections.
It’s also important to look at your core web vitals and site speed using PageSpeed Insights to find any issues that could affect your site performance and thus fix them before going live.
11. Ensure Sitemap and Robots.txt File are Correct
Earlier we spoke about downloading your robots.txt file and XML sitemaps from your current website.
Now it’s time to review them and ensure they are correct. For the robots.txt file you must review the rules to see if they are still valid or if you need to create new rules as the URL structure or site architecture has been updated.
Ensure you test any new rules you create as you don’t want to block search engines from accessing important pages that rank for crucial keywords.
Additionally, ensure that the new and updated sitemap(s) are referenced in the new robots.txt file and not the old sitemap(s).
The new sitemap(s) should have all your new URLs and follow best practices such as including only indexable URLs, the size doesn’t exceed 50MBs when uncompressed, and only pages return a 200 ok response.
12. Set Up Google Analytics 4 and Google Search Console

Setting up tracking in Google Analytics 4 (GA4) and Google Search Console ensures robust monitoring and a smoother transition during the migration.
On GA4, you can create a new GA4 property for the staging site, add the GA4 tracking code to your site’s header or through Google Tag Manager.
On Google Search Console, you can add a new property for the staging site and then verify ownership using methods like HTML tag, DNS record, or Google Analytics 4.
Pre-Migration SEO Checklist: URL Mapping
Below we have provided you with all the steps required to correctly map your old URLs to corresponding URLs on your new site to ensure successful migrations.
13. Map URLs and Create 301 Map
- Use your favourite crawling tool (we recommend Screaming Frog) to obtain a list of all the URLs from your current website and export it to an excel sheet.
- On a different excel tab, change the URL structure to the URL structure of the new site. For example, olddomain.com/one to newddomain.com/one).
- Validation process: Crawl this list of new URLs in list mode on Screaming Frog.
- Any URLs that return a 200 Ok status code means that the URL is present on the new site so doesn’t require a 301 redirection from the current site as it would create a redirect loop, which is not good for crawl budget.
- Any URLs that return a 404 (not found) status code means that the URL is not on the new site so needs to be reviewed because it was either missed so needs to be added to the new site (with the same URL) or it was intentionally removed so needs to be redirected from the current site to an appropriate URL on the new site to preserve link equity.
- Any URLs that return a 301-status code means that the page is on the new site but simply redirects to another URL, so you need to ensure the final URL redirects to a page that returns a 200 Ok status code and to remove any redirect chains/loops.
- Review the list of 404 pages on the new site to determine whether a redirection is needed or not.
- Now convert the URL structure from the list of 404 pages on the new site back to the URL structure on the current site. They should now be URLs that return a 200 Ok status code.
- Add the 404 pages present on the current site from Google Search Console and the technical audit you performed earlier to get a final list of URLs that need redirecting – ensure you remove duplicates on excel.
- From here you can create a 301 map where you redirect all the URLs on this list to the correct URLs on the new site – ensure the URLs you redirect to return a 200 ok status code.
14. Implement and Test 301 Redirects in the Test Environment
At this stage you can implement the 301 redirects on your new site in the test environment and test them to ensure that the old URLs successfully redirect to the new URLs once you go live.
For domain migrations use absolute URLs for implementing the redirections. For migrations that don’t require a change in the domain name, you can simply use relative URLs for implementing the redirections.
To test your 301 map, convert the URL structure of the current URLs to the new URL structure on the new site from the 301 map then crawl the URLs. You should only get URLs that return a 301-status code. Any other status code means that you missed the implementation of some URLs, so you need to identify them and add the redirections.
You should also get the original list of all the URLs on your current site (ones you redirected and ones you didn’t), convert the URL structure to the URL structure of the new site, and then crawl them.
You should only get URLs that return 200 Ok and 301 status codes, which indicates that you have successfully mapped and redirected all the URLs on the current site to the correct URL on the new site.
Note: it’s also important to do the same process for the images too as they contribute to domain authority and organic search traffic so ensure you map and create a correct 301 map for them.
SEO Migration Checklist
On the day of the migration, double check with your team that the website is ready to be launched and follow our SEO Migration Checklist.
15. Launch the New Website
Choose a time to launch your website, ideally during periods of low traffic. This could be over the weekend or late at night when there are fewer visitors. Enable maintenance mode to notify potential users that the site will be back shortly.
Prior to launching your site, ensure you have a complete backup of your current website. This is crucial in case any issues arise during the migration.
Remove the password or the protection not allowing search engines to access the website, change the robot tags from noindex, nofollow to index, follow, for all the pages you want to be indexable.
16. Ensure the New Website is Crawlable and Indexable

Your second step in the list is to control that the website is accessible by users and search engines, and that the pages are crawlable and indexable.
Crawl the website with Screaming Frog, SEMrush or similar tools, to check that all the main pages are accessible and return “index, follow” robot tags.
If not, double check those pages returning a different combination of tags, and ask your SEO Executive to confirm the crawlability and indexability of those pages with a different combination of tags.
17. Implement the 301 map
After the new site is live, implement 301 redirects from the old URLs to the new relevant ones, by following the 301 map. If you’re changing the entire domain, ensure the home page is also redirected.
According to Google’s recommendation, these redirects should remain in place for at least a year, and we advise keeping them longer, especially for larger websites.
Post-Live SEO Migration Checklist
Once the 301 map is implemented, it is important to act fast and review if the migration was positive and to check the status of the new live site.
Below, you can find the post-live SEO migration checklist we propose.
18. Post-launch Website Crawl and fix any important issues

Once the website is live, it is extremely important to crawl the new live site with your favourite SEO tool.
At this point, you should check the outcome of your audit, and fix all the main issues which can affect the ranking of its pages and its functionalities.
Focus on:
- Pages missing or with duplicate title tag, H1s, meta descriptions
- Pages missing indexing and canonical tags
- Internal and external links to 404 pages
- Internal links pointing to 301
- Internal redirect loops or chains
- Orphaned Pages
- Duplicate Content
- XML Sitemap issues
- URLs with wrong page paths (non-ASCII characters, underscores, upper letters, multiple slashes, with space)
- Images missing Alt text
While all these issues should all be fixed from the pre-live tests, it is important to double-check after the migration went live to exclude any mistakes missed in the process, and to fix all of them.
19. Test All the 301 Redirections
This is one of the most important post migration steps, as it confirms if the SEO migration was successful or not. Take the list of all old URLs used for mapping the 301 redirects and test their response code.
Here at Autify we suggest crawling them using Screaming Frog in list mode. In the advanced configuration settings, enable “always follow redirects.” This allows the crawler to follow the redirects to the final target regardless of crawl depth.
Ideally, all URLs should return a 301 status and the URL they have been redirected to. If any return a 200 status, the redirection added needs to be removed promptly. Similarly, if any return a 404 status, the old redirection should be removed and they should be redirected to the correct page immediately.
20. Ensure the new XML Sitemap is Correct and submit it to Google Search Console

Once the website is live, you need to validate your sitemap and verify it is correct. There are many websites online which allow you to do so, but the best way is through its submission to the Google Search Console Sitemap Tool. It will check and validate the sitemap, and this will help Google to discover, crawl, and index the pages.
21. Verify the robots.txt file is correct
You can test the correct functioning of the robots.txt file through the Google Search Console robots.txt report, or through the use of Screaming Frog, or other websites or tools too.
The correct functioning of this file is very important, as it tells search engine crawlers which URLs the crawler can access on your site. This is used mainly to avoid overloading your site with requests, and to avoid the crawl and indexing of filter and search pages that don’t add any value to the SERP.
22. Submit Domain Name Change in Google Search Console (if necessary)
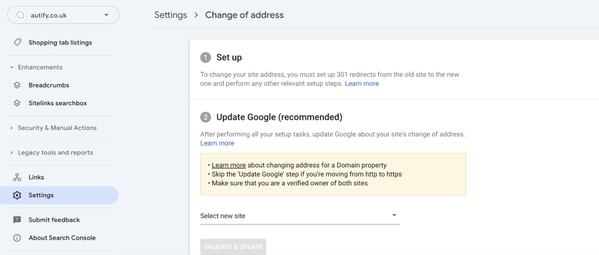
This step is not always necessary, but must be followed when the name of your domain is changed (i.e. from https://www.oldomain.com to https://www.newdomain.com).
In this case you should submit a change of address request to Google Search Console through the Change of Address Tool to communicate the variation.
When requested, Google will check if the home page (root page) of the old domain has been submitted to the new domain.
When the request is received, Google starts dropping the indexing of old URLs, and starts replacing them with the new URLs.
This step works with the 301-redirection performed with the launch of the new website, and this is why it is extremely important to verify the redirections proposed from the 301 map, as it can help to transfer the ranking of the old URLs to the new ones.
23. Add the New Website to Rank Tracking and Analytics Tools

In case you changed the name of your root domain, don’t forget to update it in your tracking tools. These include Google Analytics 4, Google My Business, Google Tag Manager, Google Search Console, as well as Google Merchant Centre, listings where your website appears, third party tracking and analytics tools too.
This is essential to ensure accurate tracking of users’ behaviour and conversions and also for the correct reference to the new domain.
24. Update the tracking of events and conversions
When dealing with a new website, remember to update tags and triggers on Google Tag Manager and other tracking tools working to collect, track and register users’ behaviour and conversions.
Remember to always test the correct tracking of events and conversions using the preview mode on Google Tag Manager and the Debug View mode on Google Analytics 4 to guarantee clean and clear tracking of the users’ behaviour.
25. Implement Tracking Codes and Make an Annotation
Once the new website is live, the redirections are all placed, and the post-live SEO migration check confirms the success, make an annotation on Google Analytics 4 and Google Search Console of the date of the SEO migration. This will help you monitor the effect of the migration and diagnose any traffic loss or changes.
26. Monitor the New Website’s Rankings, Traffic and Conversions
Finally, monitor the traffic and rankings for the keywords you are tracking. Pay special attention to the top traffic pages from the old website. If the traffic to these pages is stable or increasing, there is no cause for concern.
However, if there is a sharp decline in traffic, identify the affected pages and determine the cause. First, check if the 301 redirect is functioning correctly. If it is, then examine whether the content on the new page differs from the old site. In most cases, the issue is either a malfunctioning 301 redirect or altered content.
Also check the number of backlinks to your website, and check if you lose any from top authorities. It might be necessary to get in touch with them and ask them to reference the new pages.
Conclusion
An SEO Migration is a complex task that requires preparation and multiple verifications to be successful.
If you are doing your first SEO migration or have little experience, it can be risky to migrate a website by yourself, as it can harm its visibility and rankings, dropping its authority for months.
Here at Autify Digital we have years of experience in delivering successful SEO migrations, with a tried and tested method that reduces complications and that helps deliver a successful SEO migration without losing traffic and visibility.
If you need help with your SEO migration or other SEO activities, get in touch with us at +44 0115 778 6950 or info@autify.co.uk. Our expert team will help you devise a clear plan with our migration services.
Read More Blogs

How to choose the payment gateway for your E-commerce
With multiple options available at various prices and benefits, choosing the

100+ Useful E-commerce Statistics to Guide your Strategy in 2025
The e-commerce industry has grown at an unprecedented pace and staying ahead of